If you’re reading this, you are probably experiencing that heart-sinking moment when your power button refuses to bring your Dell laptop to life.
There are various reasons why your laptop may not be starting. It could be grappling with hardware failures, software issues, graphics driver failure, power supply issues, or even complications in the BIOS settings.
With any computer repairs, there is usually a diagnostic troubleshooting list to follow, which can help you figure out what the problem is.
This is because there could be multiple reasons why your laptop may not be starting, so start with the easiest repair first and go from there, slowly eliminating each item off your list until you figure out what the issue is.
So before you panic, let’s walk you through a few troubleshooting methods you can try at home.
(And remember, if you have tried all the tips below and your laptop is still not working properly, our expert team at Dave’s Computers is always ready to help!)
Issue 1: My laptop won’t turn on at all

If your laptop isn’t turning on at all, try the following.
1.Check if there is a static build up
Step 1:
Unplug your charger, and turn your laptop over.
Step 2:
Remove your battery – If you struggle to remove your battery, you might have an internally built one.
This can be harder to get to.
You will have to take all the screws out of the bottom of your laptop and use a small plastic pry tool to gently pry apart the seam case and the palm rest section.
Remember to be very careful because you could damage your laptop if you don’t do this correctly. If you rip this apart too quickly, you stand the chance of damaging all the ribbing cables. If your battery is internally built, you might want an expert to look at your laptop instead.
Step 3:
After removing your battery and charging cable, hold your laptop’s power button down for 1 minute. Why? Because it drains static from your machine and static affects the way your computer works. After you have done this, you can put your battery back in and plug your charger in too.
Step 4:
Now try to turn your computer back on. If it switches back on – GREAT! It means there was just a static build up on your laptop.
If it doesn’t turn back on, try the following.
2. Check your charger and battery
If you’re still stuck, your AC adapter or battery might be the problem.
Step 1:
Take your charger and your battery out again.
Step 2:
Hold the power button down for another minute.
Step 3:
After you have held the power button down for a minute, put your battery back in. Don’t plug your charger back in just yet.
Now try turning your computer back on.
If your laptop turns back on, it means that your computer and your battery are fine. The problem is probably with your charger.
Sometimes when a computer senses that a charger or a battery is on its way out, it will stop itself from turning on to avoid any damage.
If the charger is the issue, you will have to have it replaced.
Step 4:
If your laptop is still not turning on, repeat the entire process to check if your battery is the issue. Take your battery out, hold the power button down again for another minute and then put your charger in (leave your battery out this time.)
Now try turning your computer on again. If it turns on, it means your battery is the issue and needs to be replaced.
Issue 2: Your Dell laptop is turning on but freezing or turning on and off again.
If your laptop powers on but freezes or crashes after the Dell logo screen, you will have to do a BIOS reset. This is quite an intrusive fix, so if you don’t feel comfortable trying this, leave it to the professionals.
But if you’re willing to give it a try, do the following.
Step 1:
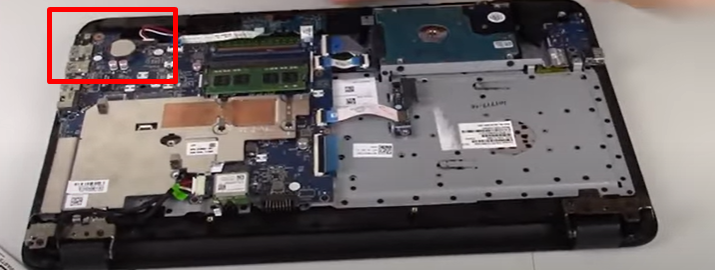
Note that every laptop has a small internal battery called the CMOS battery on the motherboard. This supplies power to the motherboard and your BIOS system. So even if your computer is turned off, it gives power to your BIOS system.
If you remove this small internal battery, it will then cause your laptop to reset to factory settings. This can sometimes help your computer switch on.
These CMOS batteries can look like this:

Some laptops have a section that you can unscrew and easily access these batteries. But with other computers, you might have to remove the entire base.
Take your battery out, and then unscrew the screws in your base. Also, double-check if there are any screws under the rubber feet of your computer.
You can usually just take the rubber feet off and this will expose some extra screws to loosen.
Step 2
Use a plastic pry tool to slowly separate the base of your computer from the palm rest. Remember to do this gently because if done incorrectly, you can cause damage to your laptop.
Once you have access to your motherboard, look for your CMOS battery.

Be very careful when taking your CMOS battery out because the case that it is placed in is very fragile.
Step 3
Leave the CMOS battery out for 15 – 20 minutes. Put the battery back, close up your laptop and turn it on. If it switches on, it means that this was a success. But you will still have to access the BIOS utility and reconfigure some of your hardware settings.
If this STILL didn’t work, it might mean that the CMOS battery may need to be replaced.
Check to see if your display has failed
This doesn’t happen often and is very much unlikely, but it could be possible that your display is no longer working.
If your computer starts and makes all the right sounds, but there is still nothing on your display, this could be the issue.
In order to check, plug an HDMI cable from your laptop to your TV. If you notice that the display projects with no issues on your TV or desktop, you know your laptop’s display is the issue.
If the above checks have not helped you identify the problem, here’s what to do next:
Investigating hardware issues in Dell laptops
Hardware failures like a malfunctioning hard drive or problematic RAM can cause your Dell laptops not to start.
Listen for unusual sounds from your laptop – clicking or grinding could indicate a hard drive problem. You can also try reseating or replacing the RAM to diagnose or potentially resolve the issue.

Using Dell’s built-in diagnostics for hardware failure
Your Dell laptop is equipped with built-in diagnostic tools that can be incredibly useful in situations like these, whether you have a hardware problem or a software issue.
Here’s how to use the built-in diagnostic tool:
- Turn on your laptop and repeatedly press the F12 key to access the Boot Menu.
- Choose ‘Diagnostics’ and follow the instructions that appear. If issues are detected, you’ll receive an error code that can be used for further assistance on Dell’s website or with a professional. Dell’s website has a section where you can enter these codes and get specific troubleshooting advice tailored to the problem or root cause detected.
- You may be prompted to update BIOS or press the power button, depending on your Dell laptop model.
If you need assistance, you can share these codes with our professionals at Dave’s Computers for expert advice.
Important reminders for computer hardware checks
For hardware checks, it’s important to proceed with caution to avoid causing more harm than good. If you suspect a RAM problem, ensure your laptop and the external display are completely off before opening the memory compartment on the back of your laptop.
Carefully remove and then reinsert the RAM modules to ensure they’re seated correctly in their slots. If the problem persists, testing each RAM module individually might help identify if one is faulty.
Software troubleshooting
Software issues, including corrupt system files, malware, a Dell laptop black screen, or a problematic update, can be the culprits behind your Dell laptop’s black screen error.
Try booting your laptop in Safe Mode to see if the issue persists.
This mode only loads essential drivers, so it can help pinpoint software issues. Using system restore points to revert your laptop to previous settings can also help if a recent change has caused the problem or you’re getting recurring error messages.
If all else fails, you may need to reinstall Windows.
To start your laptop in Safe mode, do the following:
- Hold the Shift key while selecting Restart from the power options.
- This will lead you to a blue screen with multiple options where you can choose ‘Troubleshoot,’ ‘Advanced options,’ and finally, ‘Startup Settings.’
- Once there, you’ll have the option to restart and then select ‘Safe Mode.’
- To use a system restore point, search for ‘Create a restore point’ in the Start Menu, then choose ‘System Restore’ in the System Properties window that pops up.
- Follow the instructions and select a restore point from before your problems began. You may then need to do a hard reset.

Preventive Measures
To avoid your Dell computer not starting in the future, regular system maintenance can go a long way.
Keeping your software updated, running regular virus scans, backing up data, and cleaning your laptop to prevent overheating are recommended.
When to seek professional help
If your black screen issue remains unresolved despite your efforts, or if you’re uncomfortable with the troubleshooting steps, it’s time to bring in the professionals.
Recurring issues, unusual sounds, or persistent lack of response from the power button are signals that you need professional help.
Dave’s Computers will be happy to help with any tech issues you might be facing. And if your Dell laptop is still under warranty, Dell’s customer support services are also an option.
In Conclusion
Dealing with a Dell laptop that won’t start can be a stressful experience, but we hope this article has empowered you with useful troubleshooting strategies.
Recognizing when to seek professional help is crucial to prevent further damage to your laptop.
For all your Dell computer repairs, IT support, and data recovery needs, trust Dave’s Computers. You can reach us at (908) 866-8173 or drop by our store at 415 Amwell Rd, Hillsborough, NJ. Let us handle the hardware problems so that you can enjoy a seamless digital experience.

