Dave’s Computer’s data recovery service is one of our most popular. Both businesses and individuals come to us having lost or accidentally deleted data on their hard drives and need us to get it back for them. We are always happy to help our Hillsborough neighbors but we think it only fair to tell you that you can do some of it yourself too.
If you use Windows 10, you have a few backup options that can save you losing important data from your hard drive. The operating system includes a full backup and restore option but also a file recovery option that allows you to save important files somewhere safe. For some reason, this feature is not enabled by default but you can quickly set it up.
There is also OneDrive built into Windows 10 that you can use to backup important files to the cloud. It can also save your hide if you delete something accidentally and need to perform a little data recovery. I’ll show you how to do that too.
Windows 10 File History
Windows 10 includes File History but does not enable it by default. Fortunately, it is the work of seconds to set data recovery up. For it to work properly, you will need a separate hard drive attached to your computer with a few gigabytes of free space.
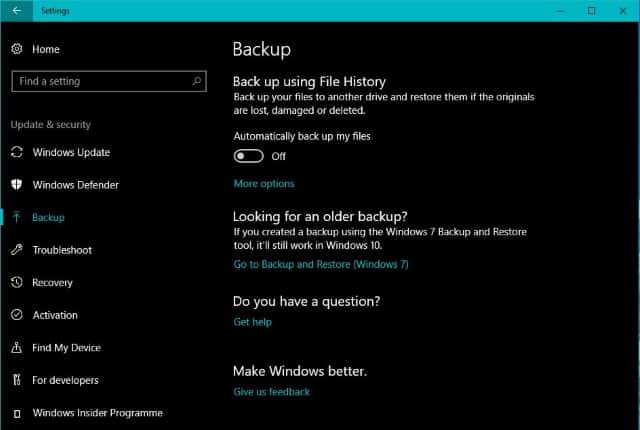
- Open Settings within Windows 10.
- Select Update & security and then Backup.
- Slide the toggle under ‘Automatically back up my files’ to on.
- Select the Backup options text link.
Set the files you want to save within Backup option and the frequency of those backups. Saving every hour may be a little too much if you’re a light user but just enough if you use your computer for school or work. You can change it to 3, 6, 12 hours or daily. Choose the frequency that works for you.
Under ‘Keep my backups’ you may want to change it from forever to something more practical. These backups do have a tendency to steal disk space so setting it to 3 or 6 months might be more realistic. Again, if you use your computer for work or school, you might want to keep them longer. Much depends on how much disk space you have.
In the left pane of Backup options, you will see the folders that are currently selected for backup. The defaults might work for you but just select Add a folder to add more or click a folder and select Remove to take away folders you do not need to back up.
If you come up against any issues with your backup, return to this window and select the ‘See advanced settings’ under the Related settings option underneath the folders. It will take you to the old Control Panel screen for backups and allow you to check the destination disk for issues, check for disk space and troubleshoot file backup.
Restore files from Windows 10 File History
To perform data recovery from Windows 10 File History you have a couple of options. The easiest way is to use Windows Explorer.
- Open Windows Explorer to the folder where you need to recover files.
- Select Home and then History from the right side of the menu.
- Select the file from the new window, right click and select Restore.
- Rinse and repeat for all files you need to recover.
You can also view the individual copies of a file from within Explorer by highlighting the file and then using the History menu option as above. This will present all versions of that file in File History for you to select one to restore.
You can also perform data recovery from the File History section of the Windows Settings menu.
- Open Settings within Windows 10.
- Select Update & security and then Backup.
- Select the Backup options text link.
- Scroll down to Related settings and select ‘Restore files from a current backup’.
- Select the files from the new window.
- Scroll back to different time periods using the buttons at the bottom of the window.
Windows 10 File History works alongside System Restore to offer a more granular way to save and recover files and folders. It works well and if you have the disk space, is the easiest way to keep your files safe and perform data recovery should anything be lost or deleted.
Using OneDrive for data recovery
Saving a local copy of an important file is only half of what you need for full resilience. To be fully resilient, you need a further copy off the target computer, preferably outside your home or office just in case. That’s where Microsoft OneDrive comes in. As OneDrive is built into Windows 10 it is pretty simple to set up.
Your OneDrive account is either set up or linked to Windows 10 the minute you sign in using your Microsoft account. By default, you currently receive 5GB of storage for free but you can buy or earn more storage should you need it. For basic file storage and data recovery, that 5GB should be plenty enough.
Unfortunately, OneDrive only saves files from its own folder. There is currently no way to point it to another file so you have to copy files into the OneDrive folder to back it up. You can of course do this manually or you can automate it. I automate it by using a premium product called SyncBackPro. There are other automated backup programs out there that are just as good. I just use this one. Acronis True Image is another viable option.
Here’s how to set it up.
- Configure your backup solution of choice to copy files and folders from the destination on a daily basis.
- Configure it to paste copies of those files and folders into the OneDrive folder on your desktop.
- Check regularly to make sure all copies of files and folders are current.
That’s it!
Some backup programs will come with their own cloud storage solutions but I prefer using OneDrive. As it is built into Windows and freely accessed through Windows without further logins, it just makes sense. Your mileage may vary though.
As mentioned at the top, we here at Dave’s Computers are more than happy to help you with your data recovery needs. However, we also believe in free and open access to information, which is why we give you the information you need to make your own decisions. I hope you find it useful!