Dave’s Computer Repair Blog – How to securely delete files from your hard drive
As well as helping the good people of Hillsborough with their data recovery needs, we also advise on IT security. One of the things you quickly realize when dealing with computers is that data is rarely gone from a drive. More that it is temporarily unobtainable. Only when a hard drive is physically destroyed can data be regarded as truly gone. Otherwise, with the right tools and techniques, a skilled data recovery analyst can usually get it back.
So with that in mind, I’m going to show you how to securely delete files. If you’re planning to sell your computer or hard drive on eBay or pass it on to someone else, you don’t want them accessing your stuff. Here’s how to prevent that.
Securely delete files from your hard drive
Before we get into secure deletion, it is important to know how hard drives work. When you hit delete on a file in Windows, the operating system just deletes the reference to the file. The actual data remains in place. It’s the same for a Mac, the file link in the directory is removed but the actual file remains intact. It is only when space is required on the hard drive that the data is overwritten and gone for good.
Solid state drives work a little differently and I’ll cover them in more detail in a future post.
Securely delete files in Windows
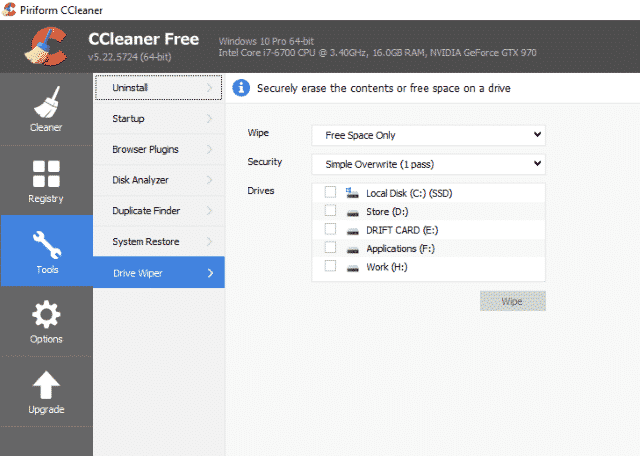
I tend to use CCleaner to delete files in Windows. The program is free and is useful for a number of maintenance tasks. I have spoken about it before when speeding up Windows (and no I don’t have shares in the company).
- Open CCleaner and select the Tools tab on the left.
- Select Drive Wiper.
- Select the drive you want to wipe, change Simple Overwrite to Complex and hit Wipe.
- Repeat a couple of times to be sure.
Securely delete files in Mac El Capitan
Since El Capitan did away with Secure Empty Trash as it embraced SSDs, you now have to use FileVault 2 to secure your data. It encrypts the entire disk which is the next best thing to secure deletion.
- Select System Preferences then Security & Privacy.
- Click FileVault and then the Lock button.
- Enter your username and password and then select Turn On FileVault.
Using FileVault has all sorts of caveats which are explained on the Apple website.
Thank you for reading Dave’s Computer Repair Blog, if you ever need computer repair or data recovery assistance give us a call or fill out the contact form on the bottom right of the website.


